Logo Template
How To Edit The Logo Template
software requirements
If you would like to use the logo that displays with your themes demo, I’ve included the photoshop file for you to edit to your brand name.
The logo has been created with Photoshop, and therefore to edit the logo template, you’ll need any version of Adobe Photoshop installed on a PC or Mac. But f you don’t already have Photoshop, you can download a 30 day free trial here while you edit the file.
The logo template is a gift that’s included if you wish to use and edit it yourself. Alternatively, there are heaps of gorgeous premade logos available to purchase on Etsy or Creative Market (my favourite store is Macarons & Mimosas!)
download and install fonts
Please download and install any fonts before editing your template so they appear in your Photoshop fonts list.
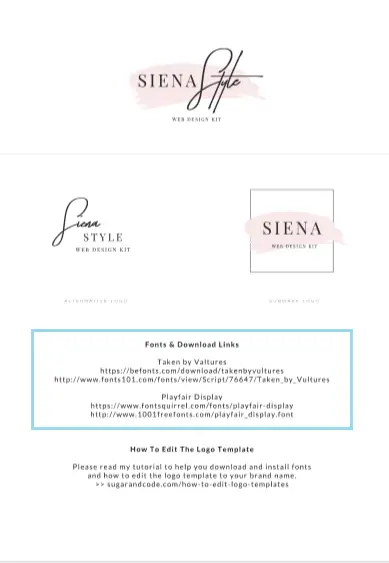
The font names and links are listed in the logo pdf document within your download folder.
Once you’ve download your font, install the font onto your computer:
introducing layers for easy editting
![]()
You’ll see each template comes with 3 logo variations. You are free to use them all for different mediums in your branding, or you might like to just choose your favourite and have that one as your logo.
Make sure the Layers window is open by navigating to Window > Layers
![]()
To edit any element, just click the item’s layer to edit it.
Each logo variation (logo, alternate logo & sub-mark) have their own grouped layer. To edit the logo, just expand the group (by clicking the little arrow) in order to edit each element individually.

You can learn more about Photoshop’s layers here
edit fonts
1. Select the Type tool to begin editing the font.
2. Next, click on the layer you wish to edit in the Layers palette.
![]()
3. Click on the text to be edited. You can edit the text, font, color and sizing as desired in the Character plette.
4. Press the ESC key when you’re finished editing.
![]()
edit colors
![]()
1. To change element colors, just double click the item’s layer to edit it and select you’re preferred color.
2. Select “OK”
![]()
saving
When you’re finished editing be sure to save the Photoshop file by navigating to File > Save > & choosing .psd file
This is a good idea in case you need to edit or resize your logo, and also if you wish to provide it to a graphic designer in the future.
Next, you’re free to convert your chosen logo into an image file.
![]()
![]()
I recommend:
– Deleting the white background (by deleting the background layer)
– Cropping your preferred logo (using the crop tool)
– Resizing the image to around 600px wide X 200px high (I’ve found around this size displays nicely for my themes)
– Saving in a PNG format to preserve the transparency by navigating to File > Export > Save for Web > select “PNG-24” > Save
resources + faqs
How to crop and resize an image
As each logo template is a free gift, I’m unable to answer Photoshop-specific questions (Plus I’m not a Photoshop professional so I certainly don’t have all the answers!)
If you do have any questions relating to editing the logo templates, be sure to re-read the above tutorials (sometimes the direction is right there but we’ve just skimmed the info) otherwise, I recommend you search for any questions in Photoshop’s own extensive tutorial collection
Copyright © 2020 · Back to SugarAndCode.com
Affiliate links are used on this site. Terms · Disclosure · Privacy